We use cookies to deliver you the best experience. By browsing our website you agree to our use of cookies. Learn More
Instructional
-
Ordering your Brompton at PerennialCycle.com
In 2013 we set a goal of adding all of our in-stock Brompton folding bikes to our website. Once they'd been added, we set a second goal: to keep the listings accurate as 1 bike is sold and another arrives. All that means that today, you can go to PerennialCycle.com and browse our in-stock Brompton selection knowing that the bikes you see are bikes we have ready for in-store pick-up or shipping to your door.
We've sorted our Brompton folding bikes models by handlebar type, so you can shop for an S-Type, M-Type, or H-Type with the right gearing for your needs and the color of your dreams. You'll also see a special section for our in-stock Ti Brompton Superlights. If you're interested in a P-Type handlebar or don't see the bike you're looking for available, call us at 612-827-8000 and we'll be happy to help you with a B-Spoke order.

As you browse through each handlebar type, you'll see a variety of different combinations of gearing and color options. From the short description for each bike you can gather quite a bit of information. As an example, a listing for an M2L in Black and Turkish Green looks like this: "M2L [Black & Turkish Green]." M is of course the handlebar type, 2 tells us it's a 2-speed, and L indicates the bike has mudguards but no rack. Black, listed first is the color of the bike's main frame. The bikes extremities are Turkish Green, the second color indicated. For a listing with only one color mentioned, the main frame and the extremities are the same color.
Clicking on the listing for an individual bike, it's possible to see more details about the bike's gearing. It might say "standard," or "12% reduced." For single speeds and 2-speeds, you'll always see "standard," as we order all of our 1- and 2-speed bikes this way. For 3-speeds, you'll see a mix of standard and lowered gearing. In the case of 6-speeds, you'll see mostly lowered gearing and a handful of bikes with standard gearing. After riding Brompton folding bikes and helping customers through hundreds of test-rides, we've come to see that -12% lowered gearing is the ideal set-up on the 6-speed for the majority of riders. As of 2013, we began ordering many of our 3-speeds with the same idea in mind. Prior to 2014, lowered (or reduced) and raised gearing incurred an extra charge. Fortunately, that's no longer the case. Now you can choose the right gearing ratio for your Brompton without worrying about an added expense.
What's the difference between lowered and standard gearing? All Brompton 6-speeds have a Brompton Wide Range (BWR) Sturmey Archer hub on the rear wheel and all come set up with the same rear sprocket set. The physical difference between bikes with standard and lowered gearing is in the front chainring attached to the crank. A 6-speed with standard gearing has a 50-tooth chainring, while a 6-speed with lowered gearing has a 44-tooth chainring. Practically speaking, that means the every gear on the bike with a 44T ring requires less effort on your part when pedaling. That means you'll climb hills more easily on a bike with reduced gearing. And, the average rider will be more likely to use the full-range (even the hardest gear) on a 6-speed bike with reduced gearing. If you're one for crunching gear ratios, you can find Brompton's chart here.
Once you've decided on a particular bike, here are the remaining details to keep in mind:
Seat Height
You can choose from one of three seatposts for your Brompton. For an inseam over 84cm/33", we suggest an extended or telescopic seatpost. The latter is best for an inseam over 90cm/35", or for taller riders wishing to minimize the height of the folded bike.
Saddle
Several options are available to select within your bike's listing, including the brightly colored Brompton Rail Saddles. If you'd like to order a saddle other than one listed here, simply add it to your shopping cart separately. If you select an alternative saddle (e.g. a Brooks saddle other than the B17 Special in Antique Brown), you may note in the comments section with your order whether or not you'd like to have the standard black Brompton Rail Saddle as well. If you choose a Brooks saddle, we recommend a rain cover for all-weather riders and the Brooks Maintenance kit or a stand-alone tin of Proofide.
Tires
We order all of our Brompton folding bikes with the company's standard Kevlar tire. It's light-weight and offers good flat protection. For an upgrade fee, we are able to send your Brompton with 1) Schwalbe Marathon tires 2) Schwalbe Marathon Plus tires 3) standard Schwalbe Kojak tires or 4) folding Schwalbe Kojak tires. Please call us at 612-827-8000 or make a note in the comments section with your order if you'd prefer we swap out the standard Kevlar tires for one of these upgrades.
Rear Suspension
Two levels of resistance are available, to suit body weight and riding style. We recommend Firm suspension for most riders, and anyone weighing over 80kg (175+ lbs) and those who value responsiveness above comfort. If you prefer a softer ride, are a lighter person or if you ride and pedal particularly smoothly, you may opt for Standard suspension.
Lighting
We order a percentage of our Brompton folding bikes with Shimano Hub Dynamos and the accompanying front and rear lights each year. The majority of our bikes arrive to our door with reflectors only in front and back. We are, however, happy to add a dynamo lighting system to any in-stock bike. We stock both the Shimano and the SON hub systems and a variety of dynamo lights. Note that pricing here may vary from the B-Spoke order form as factory-installed systems are offered at a lower price than the sum of the parts in our store. We do offer free labor when installing dynamo lighting or battery lights on any new Brompton. Still, for the greatest savings on a dynamo system with Brompton's stock headlights and taillights, it's best to B-spoke order your Brompton.
If you're interested in a headlight other than the B&M Lyt (standard for the Shimano hub) or the B&M Cyo (standard for the SON hub), or a taillight other than the standard Brompton dynamo rear light, you may either place your order by phone or choose "reflectors only" and add the necessary parts to your order one-by-one. You'll need to add a front dynamo wheel (Shimano or SON) and a Hub Dynamo/LED wiring loom to your order along with the lights of your choice and a Hub Dynamo/LED wire form bracket.
Should you be shopping for more powerful battery lighting in lieu of a dynamo system, you may consider pairing the Brompton rear battery light with a rechargeable front light from Light and Motion's Urban series. Simply choose "reflectors only" and add the lights of your choice to your cart separately. We'll install the Brompton rear battery light for you and include the headlight in the box with your Brompton.
Front Luggage & Accessories
Choose a front carrier block alone or opt for a bag set (a front carrier block + the bag of your choice). You will see a few options in our list not included on Brompton's B-Spoke order form. Learn more about the Carradice City Folder here. Or, view of the Carradice Stockport here.
If there are other parts and accessories (e.g. a rear rack or non-standard pedals) you'd like to add to your order, simply add them to your cart as you would with any other order at PerennialCycle.com.
Shipping
Our standard shipping charge on Brompton folding bikes is $40 per bike. Choose "folding bicycle" under other options at checkout. Check our homepage or sign up for our newsletter for information about shipping promotions throughout the year.
We'll install parts like the Front Carrier Block or Eazy Wheels for your convenience prior to shipping and include items such a Carradice Saddle Bag inside the box with your bike as space allows. For larger accessories like Brompton's B Bag, we may package your bike and the chosen accessories in separate boxes under one tracking number. If you're ordering a Brompton Travel Suitcase, we'll ship your bike inside the case in one box.
We welcome your questions by phone or email. If you're in the neighborhood, come on in for a test-ride any time.
-
Tools I brought on my Brompton Adventure (#BUSC 2014)

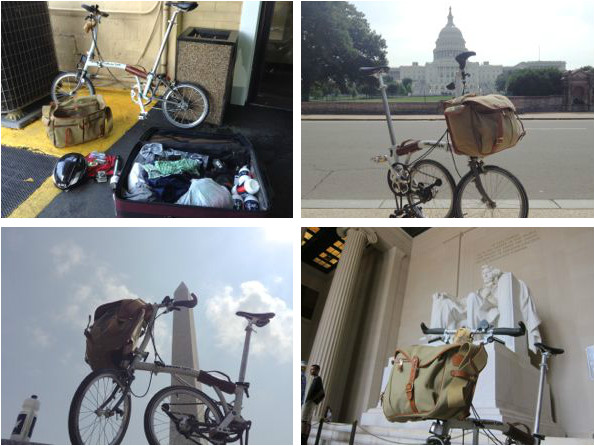
I'm currently sitting on an airplane headed to Washington DC for the Brompton US Championship 2014. I'm not certain what I did to be fortunate enough to be going, but it must have been something amazing because BUSC is a Brompton lovers dream come true!
We often are asked what tools are needed on Brompton folding bike adventures so I thought I'd lay out my own choices for all to see.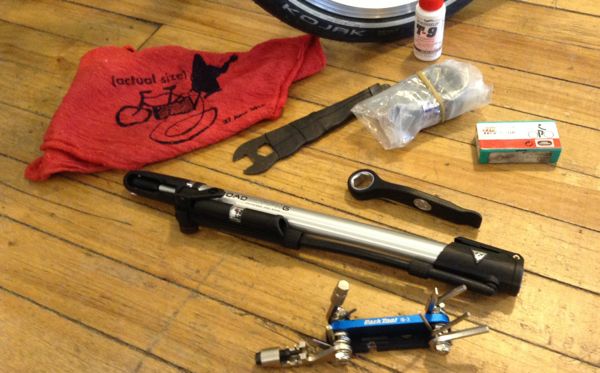
The Tools
-Park IB-3 Multitool: a fully equipped multitool (14 tools) with a chain tool and a 8mm allen wrench
-PDW San Wrencho: an elegantly practical tool you'll need to remove the Brompton's bolted-on wheels as well as removing the tires
-Rema Patch Kit: along with a couple TB-2 Emergency Tire Boots (sharp road debris is a global phenomena... it's best to be prepared)
-Schwalbe AV4 Tube: this inner tube will fit any tire that you are using
- T9 chain lube: this lube is good on both the chain and cables, just 1 ounce of T9 goes a long way
-shop rag w/rubber band, this is a nice item that all the tools can be wrapped up in. Mine happens to be a very sweet Tiny Bike Shop rag
-15mm wrench: I will use this to tighten my clipless pedals at Sunday's race (this will be left with the clipless pedals as it won't be needed on the road)
-Topeak Road Morph Pump: The biggest hazard with hand pumps is wrestling to get to full air pressure and ripping the inner tube near the valve. The Road Morph solves this by having the head of the pump on a rubber hose so that as you wrestle with the pump, the valve is not getting pulled and tweaked. Also an air gauge is built-in (bonus!)If I wasn't headed to DC to be at BUSC 2014 hosted by BicycleSpace (the BUSC clubhouse du jour) I'd likely want one more inner tube and a spare tire, but in this case I know I'll be in good hands if I should find myself in need : )
Hopefully, I'll only need the pump to fully inflate the tires (I like to play it safe by letting a bit of air out of the tires before flying) and the wrenches to swap pedals on Sunday, but having the toolkit along is easy enough and has me prepared.
ADDENDUM: I'm back from the adventure and the tools I used on my own bike:
-Air pump (I flew with the tires at about 60psi and then I aired my Schwalbe Kojaks to 110 psi with the Topeak Road Morph)
-4mm allen wrench on my Park IB-3 Multitool to readjust my Ergon grips/barends
-8mm allen wrench to remove the folding pedal, 15mm pedal wrench to remove and install the other 3 pedals (because I was using clipless pedals on race day)On Saturday's Brompton Urban Challenge I was in a group of seven (all on Bromptons) and we suffered two flat tires in the group (neither on my own bike). Both were from tubes that had gotten ripped near the valve (likely ripped from being rough on the valve when adding air to the tires). This made me all the more sure that the Topeak Road Morph is the best pump option to bring. I fixed both flats using the PDW San Wrencho, a spare inner tube, and the Road Morph hand pump. We were back on the road in about 10 minutes each time. Had our team won the Challenge I think I'd have been viewed as the Hero of the Day, but our team was less competitive and more about fun. In our minds we won...
If you have any questions feel free to contact me
-
Brompton Travel & Touring Essentials
So you've got your T Bag [3] loaded with everything for your travels. Maybe you're headed camping for the weekend or flying half-way around the world for a Brompton tour overseas. Once you've got all of your personal items ready for whatever your adventure may be, it's time to take stock and make sure both bike and rider will be well taken care of no matter what the road has in store.
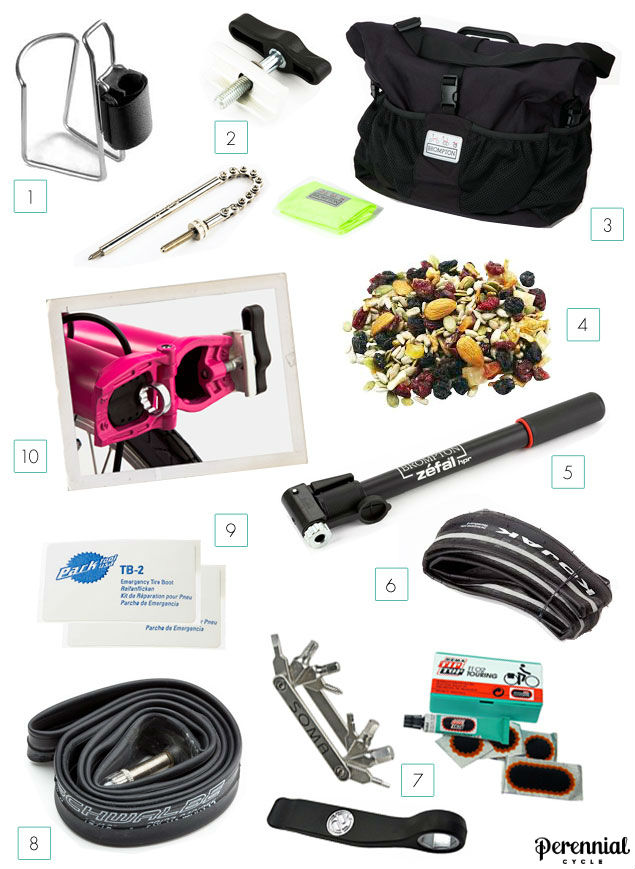
If you're planning a lengthy ride or a multi-day tour, you'll want to make sure you stay well hydrated. Since a Brompton doesn't have water bottle cage mounts like you'd find on a typical bike frame, most Brompton riders are accustomed to carrying water inside their front luggage or in a jersey pocket. When one bottle isn't enough, we like the Two Fish Quick Cage [1]. It fits well on both the Brompton main-frame and the stem riser below the handlebars. Both spots are accessible while riding. And let's not forget snacks [4], a lack of which often causes conflict while traveling.
With food and water covered, let's delve into the care of your Brompton on tour.
For multi-day rides and longer trips, it's important to be aware of what components are specific to your Brompton. Depending where you are traveling, these small parts can sometimes be the hardest to source. Sophie, an experienced U.S.-based tourist, recently shared with the Brompton Blog that she won't leave home without a spare Gear Indicator Chain [2, bottom]. Several of our local customers who travel by plane with their bikes on a regular basis also include a pair of Hinge Clamp Assemblies [2, top] in each suitcase. We recommend that these be removed before shipping or checking your Brompton on a flight to avoid any chance of damage, but to be doubly sure a spare set is an excellent idea.
Before you fly, you'll also want to deflate somewhat both of your tires. So that you're ready to air-up when you reach your destination, be sure to pack your pump [5].
And, speaking of tires... many tourists erring on the side of caution like to bring not just spare tubes [8] (an absolute must), but even a spare tire along. Sophie mentioned she'll be packing a spare 16" Marathon for future trips. If you want to be prepared but don't have space for a Marathon, a folding Kojak [6] makes for a more compact package. Care to take your chances and save room for other items? Why not pack a credit card-sized packet of Emergency Tire Boots [9] just in case?
While it's not unheard of to need a new tire as a result of a flat, more often than not the problem is with the tube itself. Of course, before you jump to fix a flat with a new tube, it's often wise to use a patch first — especially if your spares are limited. If you haven't yet gotten your hands on a Brompton Toolkit [10], we recommend carrying a good patch kit, the multi-tool of your choice, and the PDW 3wrencho [7] for removing a wheel and tire in the event of a flat.
-
Bike Commuting: Building the Habit
I see a lot of blog posts and tweets, and hear a lot of people in the shop repeating the same intention: I'd like to start bike commuting. But how do you go from the thought to the reality? In reading this line in a Zen Habits post today, I saw the answer:
"You could keep putting it off. Or you could read an article or three about it. You could find three examples of people who have made the change. You could surround yourself with several people making the change themselves. Pretty soon the surrounding works. The repetition convinces you, motivates you, to take action. Repetition works."
It's no wonder so many of our staff bike to work on a daily basis. It's contagious. There's a lot of *good* peer pressure to bike commute when you work at a bike shop. Wherever you work, though, you can create an environment and a community that will help you keep the momentum in that initial intention going strong. Inspired by Leo's post and a few others from the site, here are a handful of ways to make bike commuting a regular habit in your life.
Surround yourself with others who bike commute in your city, neighborhood, or workplace. Talk to them about their experiences. Learn from what works for your neighbor, friend, coworker.
Read about how others make bike commuting a part of their daily life. Learn from their example.
Repeat to yourself, "I bike to work every day — it’s who I am." As Babauta says very clearly, "By repeating this to yourself, [biking] (or whatever change you’re making) becomes part of your identity."
Make biking to work your #1 priority. What does that mean? Perhaps it's commiting to commuting by bike on Mondays. By starting your week off with a ride in to work, you'll be more likely to flow naturally into doing so on Tuesday, Wednesday, and the day after that. For some it's putting out their riding gear the night before. Packing a pannier or gathering your outerwear after checking the next day's forecast. For the committed, all-weather rider, it means being prepared to bike in whatever mother nature throws at you with clothing that will keep you warm and dry and practical accessories like fenders for your bike. These don't have to be expensive investments. You can make a fender from a milk carton, after all.
If you've never bike to work before, make a route plan and practice the ride in on a non-work day when there's no pressure to arrive at a certain time.
Start small. Maybe in and back is too tough when you're first starting out. Try taking the bus to work in the morning with your bike, then riding home. After a couple of weeks, take the plunge and do the both trips by bike.
Get accountability from your fellow-bikers and others in your life. Once you start biking to work, you might notice that your coworkers greet you with the question, "Did you bike today?" each morning. Pretty soon, you'll be excited to reply with an enthusiastic, "Yes!" This will be especially true on those "bad" weather days you might have driven in the past, inevitably stuck in traffic. Cold, snow, and rain will change from obstacles to interesting new ways to experience your ride.
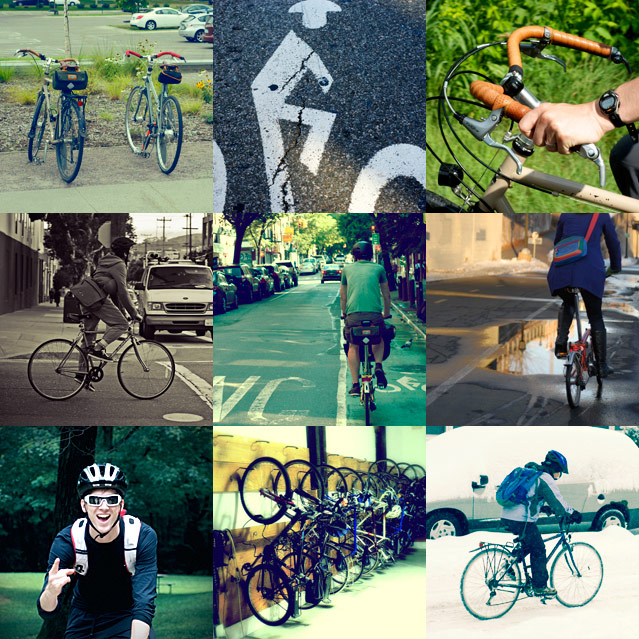
Make it social. Share photos from your commute on Twitter, Instagram, or Facebook. Plan to ride in (or ride home) with a coworker once a week or once a month. Participate in #30daysofbiking. Meet fellow bike commuters for happy hour on Friday at a spot with great bike parking.
And finally, enjoy the ride.
All photos by Martha @ Perennial Cycle except: Left middle, by Dave Fayram; Bottom center, by Mahalia Stackpole.
Search
Latest Posts
Blog Categories
- At the Market (1)
- Bags! Bags! Bags! (14)
- Bike Culture (14)
- Bike Profile (12)
- Custom Modifications (11)
- Event Recap (5)
- Events (14)
- General (12)
- Holiday Gift Guide (11)
- Instructional (11)
- Miscellaneous (35)
- News (49)
- Perennial Favorites (18)
- Product Showcase (70)
- Repair Highlight (12)
- Ride Chatter (20)
- Service (4)
- Shop Fun (13)
- Used Bicycles (0)
Instagram
We're Social : )
Validate your login
Sign In
Create New Account