We use cookies to deliver you the best experience. By browsing our website you agree to our use of cookies. Learn More

Repair Highlight
-
Service Loaners -Tern Short Haul

Tern Short Haul Cargo Bikes -Perennial Service Loaner When you make a service appointment, the last question is if you would like a loaner bike while your bike is in the shop for service. The fee is $25, which covers the time from you dropping off your bike to the day after we contact you to say that your bike is ready for pickup.
The bikes in our Service Loaner program are Tern Short Hauls. These are very versatile mid-tail cargo bikes that we think you'll like a lot.
The bike will come with:
- dynamo lights (front & rear)
- rear rack w/bungee chord
- one large pannier
- frame lock w/extension chain
- fenders
- kickstandThe Short Haul is a very capable utility bike. The rear rack can accept either a Yepp Maxi Easy Fit child seat or a Yepp Nexxt Maxi child seat. The single pannier is a 37 liter Cargo Hold 37.
If you are not able to return the bike the day of, or the day after we let you know your bike is ready, you will be charged $25/day until returned.
Lost key fee is $10.Treat this bike like it is your own:
YOU are responsible for this bike while it is in your possession. The bike has some anti-theft features like a seat leash, frame lock (to secure the front wheel) and a chain that integrates to the frame lock, but these items do not guarantee that the bike (or parts) will not be stolen. We do not have insurance that will cover theft from you, so understand that you will be responsible to pay for this bike if it's stolen or vandalized.
If you get a flat tire, you will need to pay for the tube (& possibly the tire), though we will cover the labor...
Dirty bikes will be assessed a $25 minimum cleaning fee. -
Chains for Brompton Folding Bikes

Servicing bikes is taken very seriously at Perennial Cycle. Brompton Bikes are a big part of our service department. It's only natural that we would offer the best chains that you can install on your Brompton Folding Bike to make it shift quickly and run smoothly.
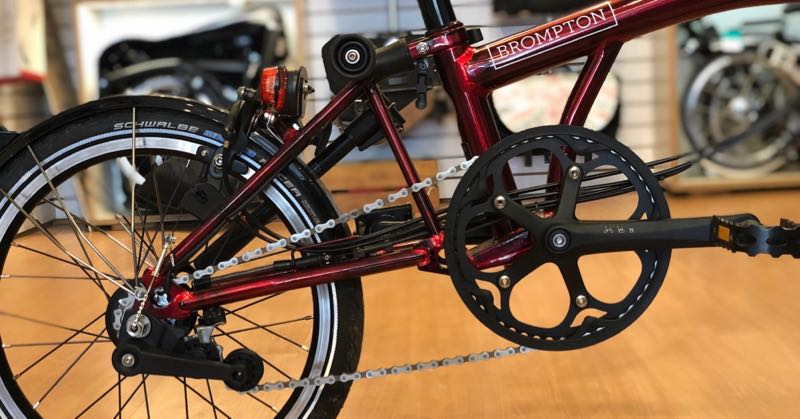
While the stock (OEM) chain is functional in a gets-the-job-done kind of way, the chain is the heart of your bike's transmission and thus a great component to upgrade to help you get the most out of your bike. Being that the Brompton chain is a basic OEM chain, we feel pretty strongly that it doesn't match the quality of your amazing Brompton Folding Bicycle.
Below are 3 choices that we like a lot:-

Connex 8sX by Wipperman
The Connex 8sX is the best. Hands down.
Manufactured in Germany using the best tech available. The stainless steel plates with nickel inner links make this a weather-proof chain that is highly wear resistant. Expect an extra 40% life from the 8sX as well as improved shifting. The included Connex Link is known to be the most dependable quick link available.
This is not an inexpensive chain, but it is a great value.-

Connex 808 by Wipperman
The Connex 808 is a full nickel chain (both inner and outer plates). It can handle the weather better than most chains on the market. Also the chain plate design is the same as the 8sX, so shifting will be smooth and quick. The Connex Link (included) is legendary for being extremely dependable.
Though the 808 is not manufactured in Germany, it is quality tested prior to packaging in Hagen, Germany.-

SRAM PC 850 Powerchain II
The SRAM PC 850 is the best chain that you can buy for under $20. Uses SRAM's Powerchain II technology and comes with a SRAM Powerlink for tool-less installation. A clear step up from the Brompton OEM chain, yet keeping things very economic.-
The length of the chain is determined by the gearing on your bike. The chart below is what we use to get the chain length correct for each Brompton we're working on.
If you need help working out which length chain you need, feel free to give us a call: 612-827-8000
If you buy a chain and you choose the number of links you want it to be, we'll measure it and send you the chain as requested along with the quick link. This way you would not need a chain tool on your end.
BTW: If you are going on a trip or tour, having a spare connecting link could end up saving the day. Find the connecting links with the chains.Extra Details: If your chain needs replacing, we'd expect you to also need to replace the sprocket(s) on the rear wheel. These are available HERE. Replacing your chain and sprockets is a simple way to keep your shifting smooth and your drivetrain running quietly.
Extra Extra Details: Older Bromptons used 1/8" chains, instead of the current 3/32". We don't expect to put any 1/8" chains on Bromptons. The current sprockets available are for 3/32" chains, so if you currently have an 1/8" chain, we'd be replacing the chain and sprocket with 3/32" sprocket and 3/32" chain.
-
Leather Saddle Care

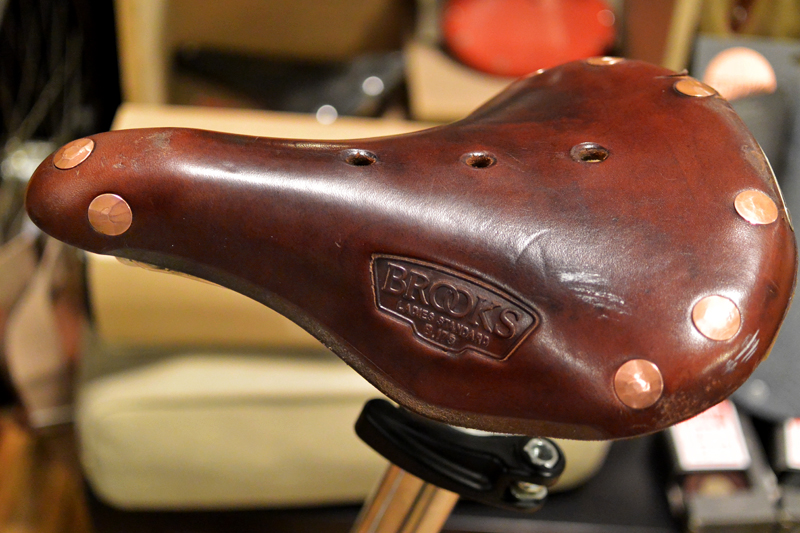
Last month, we covered a variety of ways to protect a leather saddle from rain. Through the course of researching for that article, we came across many other articles and forum posts on leather saddles. The overall landscape of information out there is disheartening. There is a lot of confusion, fear, and mystical speculation around the subject. Apparently us children of post-industrial economics have trouble thinking about natural materials, and tend to relegate them to the same bin as things like weather prediction, the Tarot, and alchemical processes. But it’s really not that complicated. Yes, you can ruin a leather saddle. You can also ruin anything else if you start poking at it without any guidance. So we’ve harvested a small heap of saddle wisdom for you to get you started.
There are a handful of manufacturers making leather saddles in 2015, some surviving since the dawn of cycling, others started on Kickstarter in the past few years. The pattern is somewhat similar to that of preserved foods, anything made of waxed canvas, hipster hatchets, and wool athletic clothing. The hype of plastic is burnt out, and we are realizing that sometimes the most technically advantageous material happens to already grow on the back of some living creature, or a tree. Our favorite manufacturer is Brooks, who have been making their saddles for a very long time indeed and, thanks to their wide distribution and eternal status, produce a multitude of shapes, sizes, and colors (and special editions, and unique editions, etc, etc…). But how to pick?! Well, we can’t help you decide which shade of brown will suit your frame color best*, nor can we tell you which saddle will fit you! Only your own body can guide you, and it usually turns out, if we may borrow the old wizarding adage, that “the wand chooses the wizard.” Stop by your LBS with the hugest selection of Brooks saddles (big hint if you live in Minnesota) and test out some saddles. Start with something appropriate for your general riding style: narrower for leaned-in drop bar riders, wider for the laid-back cruiser. Put it on a chair and take a seat, and try a few! Brooks saddles are gendered (“S” for women’s fit). It’s a little old fashioned, don’t feel weird if you feel better on the “other” type, many do! We’ll help you out if you are confused, disparaged, or lost.

So you've found a saddle. Now we are going to give your brand new $200 leather-and-steel throne a shove down its path of decay. But we are going to control it, hold its hand, massage it, give it compliments and play it Mozart. You could just throw it on the seat post and start chugging, feeding the leather off your own oily skin and sweat. This works for some, and I salute them. They ride enough and weigh enough to use their calloused Sitz bones as shoe hammers, carving themselves a dwelling into the stone-hard surface of Brooks leather. This is what Brooks recommends, by the way. But Brooks leather is tough, and bone dry. It is shaped with heat and baked at high temperatures until the fibers set, similar to the process used to make medieval leather armor. A new Brooks saddle is a tabula rasa, waiting for your personal "touch". It requires input to selectively soften the areas that need softening, thus:
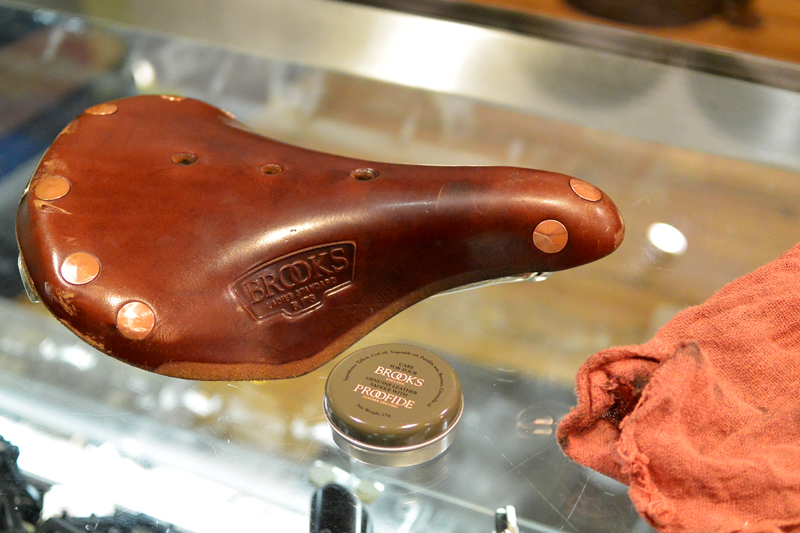
- Acquire some Brooks Proofide.
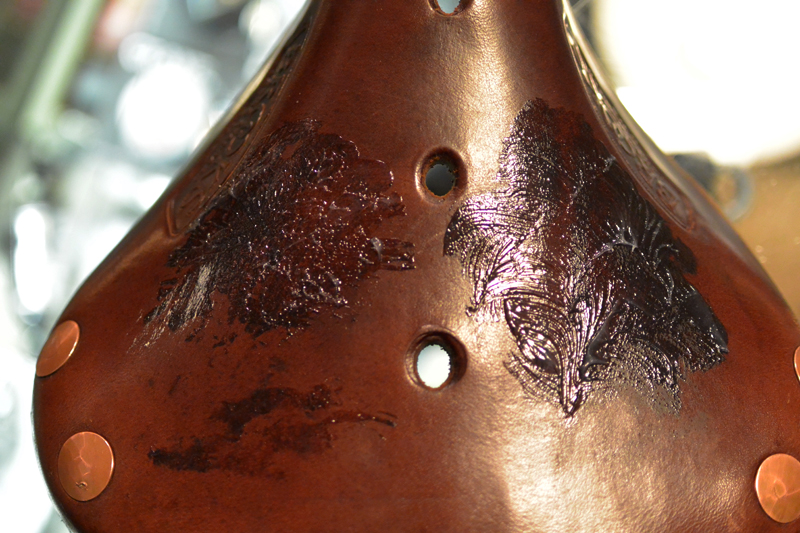
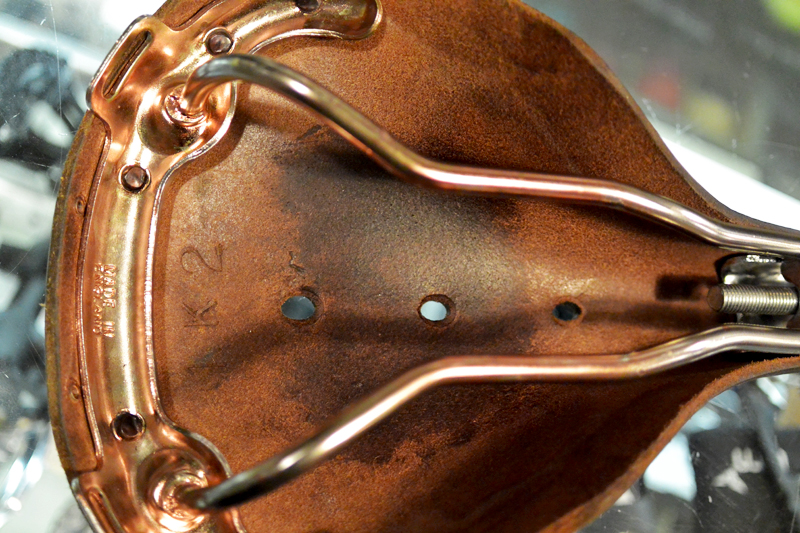
- Load a good helping onto the middle-rear section of the seat. Think of the saddle in two parts: the nose, and the seat. You are aiming for the front portion of the seat area, where your Sitz bones land. Get some on the raw underside of the saddle in the same area. Spread a very light coat on the rest of the top surface.
- Let the Proofide soak into the leather for a bit, until dry. It soaks in surprisingly fast. Like we said, these saddles are bone dry.
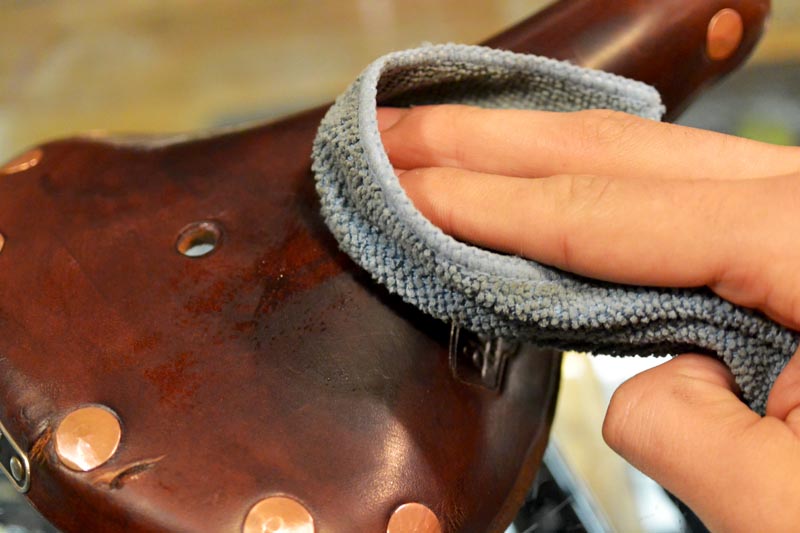
- Polish off the excess with a clean polishing rag. This will unseat any dye left on the surface of the saddle that would otherwise end up on your shorts.
- Ride hard, ride often.
- The saddle should start to deform, and should be very comfortable in 100 - 200 miles.
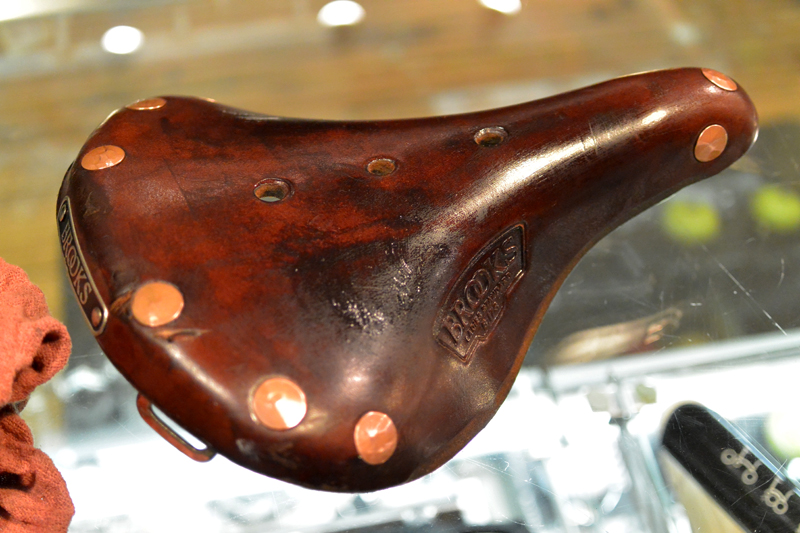
Here's what it looked like when we treated one of our store demonstrator saddles:
After the initial break-in period, an occasional treatment with Proofide will keep the leather supple and reasonably protected from water damage, but it will not be waterproof†. Proofide is made of waxes and oils, which don't mix with water, but if enough Proofide were used to waterproof the saddle, it would become too soft and would stretch beyond usefulness. Don't do it! And a final word: should you be tempted by that nice little chrome tensioning tool stamped with the Brooks logo, don't touch it! You will have plenty of experience with your saddle before it is necessary. Now go ride your magic carpet of velo-human friendship!
* - actually we can! Stop by and we’ll give you our refined and well-informed opinion.
† - see our previous post, "Seat Thoughts: Saddle Covers".
-
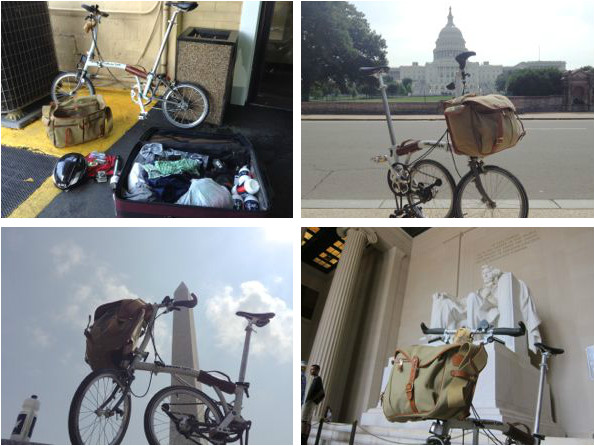
Tools I brought on my Brompton Adventure (#BUSC 2014)

I'm currently sitting on an airplane headed to Washington DC for the Brompton US Championship 2014. I'm not certain what I did to be fortunate enough to be going, but it must have been something amazing because BUSC is a Brompton lovers dream come true!
We often are asked what tools are needed on Brompton folding bike adventures so I thought I'd lay out my own choices for all to see.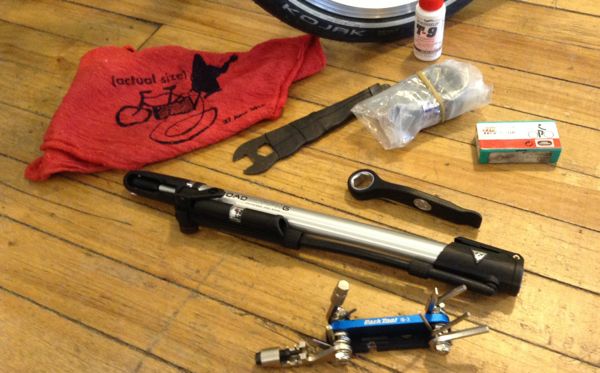
The Tools
-Park IB-3 Multitool: a fully equipped multitool (14 tools) with a chain tool and a 8mm allen wrench
-PDW San Wrencho: an elegantly practical tool you'll need to remove the Brompton's bolted-on wheels as well as removing the tires
-Rema Patch Kit: along with a couple TB-2 Emergency Tire Boots (sharp road debris is a global phenomena... it's best to be prepared)
-Schwalbe AV4 Tube: this inner tube will fit any tire that you are using
- T9 chain lube: this lube is good on both the chain and cables, just 1 ounce of T9 goes a long way
-shop rag w/rubber band, this is a nice item that all the tools can be wrapped up in. Mine happens to be a very sweet Tiny Bike Shop rag
-15mm wrench: I will use this to tighten my clipless pedals at Sunday's race (this will be left with the clipless pedals as it won't be needed on the road)
-Topeak Road Morph Pump: The biggest hazard with hand pumps is wrestling to get to full air pressure and ripping the inner tube near the valve. The Road Morph solves this by having the head of the pump on a rubber hose so that as you wrestle with the pump, the valve is not getting pulled and tweaked. Also an air gauge is built-in (bonus!)If I wasn't headed to DC to be at BUSC 2014 hosted by BicycleSpace (the BUSC clubhouse du jour) I'd likely want one more inner tube and a spare tire, but in this case I know I'll be in good hands if I should find myself in need : )
Hopefully, I'll only need the pump to fully inflate the tires (I like to play it safe by letting a bit of air out of the tires before flying) and the wrenches to swap pedals on Sunday, but having the toolkit along is easy enough and has me prepared.
ADDENDUM: I'm back from the adventure and the tools I used on my own bike:
-Air pump (I flew with the tires at about 60psi and then I aired my Schwalbe Kojaks to 110 psi with the Topeak Road Morph)
-4mm allen wrench on my Park IB-3 Multitool to readjust my Ergon grips/barends
-8mm allen wrench to remove the folding pedal, 15mm pedal wrench to remove and install the other 3 pedals (because I was using clipless pedals on race day)On Saturday's Brompton Urban Challenge I was in a group of seven (all on Bromptons) and we suffered two flat tires in the group (neither on my own bike). Both were from tubes that had gotten ripped near the valve (likely ripped from being rough on the valve when adding air to the tires). This made me all the more sure that the Topeak Road Morph is the best pump option to bring. I fixed both flats using the PDW San Wrencho, a spare inner tube, and the Road Morph hand pump. We were back on the road in about 10 minutes each time. Had our team won the Challenge I think I'd have been viewed as the Hero of the Day, but our team was less competitive and more about fun. In our minds we won...
If you have any questions feel free to contact me


Search
Latest Posts
Blog Categories
- At the Market (1)
- Bags! Bags! Bags! (14)
- Bike Culture (14)
- Bike Profile (12)
- Custom Modifications (11)
- Event Recap (5)
- Events (16)
- General (12)
- Holiday Gift Guide (11)
- Instructional (11)
- Miscellaneous (36)
- News (50)
- Perennial Favorites (19)
- Product Showcase (70)
- Repair Highlight (12)
- Ride Chatter (20)
- Service (4)
- Shop Fun (13)
- Used Bicycles (0)
Instagram
We're Social : )
Validate your login
Sign In
Create New Account